


Compact knowledge – Construction within the existing building:
Bathroom refurbishment with level-access shower
At a glance
- Construction within the existing building is a boom business
Renovation and conversion have developed into an important economic factor. When a bathroom is refurbished, a level-access shower is often desired. - The peculiarities of bathroom refurbishment
When planning refurbishment measures, particular attention has to be paid to how the pipes are laid and in what condition they are in. Also, when retrofitting level-access showers, the structure height, the slope and the waterproofing as per DIN 18534 have to be taken into account. To replace or not to replace the pipes?
If the downpipes are in good condition and not too old, it is often sufficient to install a new connection pipe to the sanitary object. Otherwise, the installation technician can lay new pipes as a front-of-wall installation or concealed.
- Drainage systems for level-access showers
Drainage systems for retrofitting a level-access shower should not only meet the basic requirements, but also often require a particularly low installation height. - Installing level-access showers
Level-access showers need a certain structure height and a suitable floor construction so that the drainage technology can be installed and the sloped screed can be applied. The bonded waterproofing must be implemented as per DIN 18534.
- Standards and rules
Most standards and rules were developed for new builds. As a result, they cannot always be implemented for construction within an existing building. However, fundamental requirements and safety-related requirements have to be met.
“Construction within an existing building” as an economic factor
Conversion, renovation and modernisation are becoming more and more important for the construction sector. This field makes up a growing proportion of all construction projects – towns and cities are densely developed and free space is scarce. If the trend towards an ageing society continues, in the long term we do not need more living space but rather different living space. Alongside barrier-free homes, the matter of energy efficiency is also more and more a central issue. At the same time, construction within an existing building has its own challenges. These include the demanding task of assessing how the new elements can be appropriately combined with the existing framework. The need for communication between disciplines increases and neither architects, planners nor tradespeople can fully foresee what awaits them at the construction site before the project begins.
Bathroom refurbishment and retrofitting of level-access showers
A considerable amount of refurbishments are carried out in the bathroom. On average, Germans refurbish their bathroom every 15 to 20 years. According to a study carried out on behalf of the German Sanitary Industry Association (Vereinigung Deutsche Sanitärwirtschaft) (2017), 6.2 million Germans were planning a partial or complete refurbishment of their bathroom for 2019.

Level-access showers in German bathrooms

Proportion of bathrooms with a level-access shower 2011

Proportion of bathrooms for which an age-appropriate conversion is planned

Proportion of bathrooms with a level-access shower 2017
Amongst the reasons for the bathroom refurbishment, and alongside the desire for a larger bathroom and general need for refurbishment, the need for age-appropriate bathrooms was also high up on the list. The level-access shower has proven to be a practical and popular option both for a more generous room design and age-appropriate conversion. For comparison: Whilst in 2011 only 7% of German bathrooms featured a level-access shower, in 2017 the figure had risen to 17%. The potential is still nowhere near to being fulfilled. Around 11% of all households without an age-appropriate bathroom are planning a conversion. That alone is equivalent to 1.8 million bathrooms which could be converted in the near future.
The peculiarities of bathroom refurbishment and when retrofitting a level-access shower
The refurbishment begins with gutting, at least if comprehensive measures are planned. Old sanitary objects, tiles and, depending on the conditions, the sanitary and electrical installation too are removed. In the process, there is a particular focus on the water supply pipes and wastewater pipes as their position more or less determines the arrangement of new sanitary objects (shower, bathtub, washbasin).
If a level-access shower is to be installed, a few other factors have to be considered: alongside the choice of the appropriate drainage system, waterproofing and planning of the slope are also important.
Pipes and connections
For a fully functional sanitary installation, the shower, bathtub, washbasin etc. first have to be connected to the cold and hot water pipes, and then the drainage system. Whilst connections and pipes for a new build can be laid as required, when refurbishing, you are tied to the existing pipes and connections.

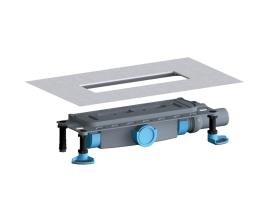
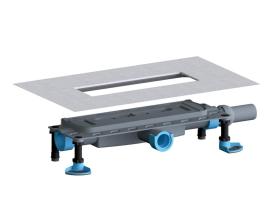
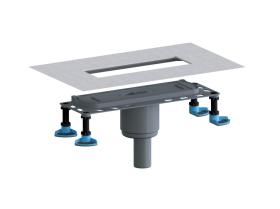
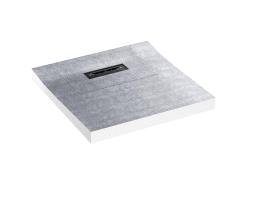
DallFlex drain body
The position of the various sanitary objects is thus largely defined – at least if the time requirement and expenditure are to be kept within limits. That is why refurbishment usually starts with the architect or installation technician or tradesperson getting an impression of the position and condition of the existing pipes.
Ideal for retrofitting level-access showers: the DallFlex drain body has three connection options for freely selectable installation of the outlet – front, left and right. This way, the drain body can simply be connected to the existing wastewater pipe.
When do the pipes need to be replaced?
In general, copper or steel water pipes last for a maximum of 40 years. If the bathroom is refurbished, it is worth taking this opportunity to replace older pipes, even if they are still functional.
Which pipes are needed?

HT/SML pipe couplings from Dallmer for a reliable and quick connection for various pipes
HT pipes with sound insulation sheathing are usually used for drainage. HT stands for “high-temperature” because these pipes are heat-resistant up to 95°C. These polypropylene pipes also excel with their resistance to acids, alkalis and salt. Trade sells HT pipes with diameters of DN 32 to DN 160 and lengths from 150 to 5000 mm. There are also junctions, brackets and adapters for connecting to other pipes.The choice of the right lengths and diameters is the responsibility of the planner. When it comes to connections for drainage, the shower channel, for example, requires an outlet as per DIN 1986-4 in order to guarantee a leak-free connection.
Pipes for the water supply pipe are dimensioned in accordance with DIN 1988-3 Technical rules for drinking water installations, usually have small nominal diameters, withstand pressure of at least 6 bar and require almost no maintenance. Since the 90s, more and more plastic pipes have been used, but copper and stainless steel pipes are still common options.
The installation of new pipes
If it is established at the beginning of the refurbishment that the old pipes do not suit the planned arrangement for the new sanitary objects, there are two options:
Scenario 1: Downpipes intact, connection not appropriate
If the existing downpipes are in good condition and still relatively new but positioned unfavourably, a talented planner can solve the problem with additional connection pipes from the sanitary object to the downpipe. The connection pipes must be installed horizontally and have a certain minimum slope. Given that the masonry must not be cut horizontally, in order not to put the stability of the wall at risk, the connection pipes are usually laid as a front-of-wall installation.
Scenario 2: Downpipes no longer intact
If the quality of the downpipes has suffered a lot in the past or if they are scheduled for replacement over the next few years anyway because of their age, they should be replaced. There are two methods for doing so – the front-of-wall installation and concealed installation.
Front-of-wall installation
When it comes to front-of-wall installation, no walls have to be chiselled open and the old pipes do not even need to be removed. Instead, the pipes are laid directly in front of the wall and behind a studding structure made from metal profiles. This method is more economical, simpler and quicker. It also makes for greater independence from existing pipes and thus opens up more freedom for bathroom design. Half-height front-of-wall installations provide additional storage area. Summarised in simplified form, front-of-wall installation involves the following steps:
- Select the studding structure to suit the respective room situation. Front-of-wall modules are available in prefabricated form and already have connections.
- Install floor and wall rails, leave enough clearance from the wall. The profiles can be cut to length to the right dimension on site. In order to fit the panelling, the wall brackets have to be installed at this stage.
- Lay wastewater pipes with a minimum slope of 2%.
- Install distributors for the cold and hot water installation, waterproof and connect to the individual “tapping points” (shower, bathtub, washbasin).
- Clad the metal profiles with the designated gypsum boards, carefully fill all joints and drill holes.
- Apply suitable primer, tile. Waterproofing must be taken into account in the wet area.
Concealed
If new pipes are laid to be concealed, this means much more work, dirt and cost. In the process, the wall has to be chiselled and the old drainage system has to be removed. To do so, a vertical wall slot with a sufficiently dimensioned cross section is required. However, breaking open a wall is a risk and is only permitted under certain circumstances, that is to say when the masonry is strong enough and remains stable even after being broken open. For this purpose, structural certification as per DIN 1053-1 is required. Given that this method generates a lot of dust and rubble, the house or the flat cannot be inhabited during this period. When it comes to exterior walls, measures must also be taken to ensure that no thermal bridges are generated.
Waterproofing for pipe penetrations
If new pipes or connection pipes have been laid, the connection points also require proper waterproofing. Sealing tapes and sealing sleeves as per DIN 18534 in accordance with an ETA (European Technical Approval) or a General Building Supervisory Authority Test Certificate are usually used for this purpose. To make it possible to waterproof the connections correctly, the pipelines must reach beyond the waterproofing level a little. Only then can the sealing sleeve enclose the pipeline and seal it tight. If the pipeline is too short, what are referred to as spacers are used to extend the pipelines by up to 5 mm. Insufficient lengths are more likely to be a problem for concealed installation. When it comes to front-of-wall installation, the correct connection lengths are defined by the construction.
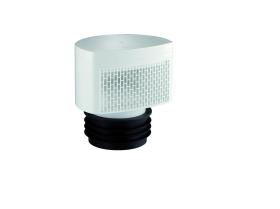
Venting pipes
Regardless of which way new pipes are installed, the installation technician must always keep in mind sufficient ventilation of the pipes. Because, when the used water is drained, negative pressure is generated in the pipe. If this is not offset by incoming air, the negative pressure draws the water trap from the siphon. This removes the barrier between the sewage system and the bathroom, allowing unpleasant smells to arise. Well-planned ventilation prevents this problem. The installation of air-admittance valves has proven to be a convenient solution, particularly for renovation and conversion measures. Air-admittance valves are mechanical valves which equalise the pressure in the pipe system. In the case of negative pressure, the ventilation valve opens and fresh air is sucked into the pipe until the pressure is equalised again. This way, the air-admittance valves prevent the siphon from becoming emptied and drain odours from entering into the bathroom. As long as the pressure is equal, the valve remains closed, and in the event of overpressure, it seals the system. Air-admittance valves ensure long-term and problem-free functionality.
Functional description of an air-admittance valve using the example of the DallVent Maxi

In the case of negative pressure in the pipe system, the ventilation valve opens and the incoming air equalises the pressure.

In the event of overpressure, the ventilation valve seals the system. No sewer gases can escape.
Installing an air-admittance valve
The following points must be taken into account when installing air-admittance valves:
- Only approved for detached and semi-detached houses or comparable building units.
- The air-admittance valve must be installed vertically.
- A supply of fresh air must be ensured at all times.
- The air-admittance valve must always be accessible.
- In the case of connecting pipes, air-admittance valves must be mounted at least 10 cm above the pipe, and in the case of downpipes, at least 60 cm above the highest pipe branch.
- Protect the air-admittance valve from contamination during the construction phase.
- Air-admittance valves can be installed below the backflow level of the connected drainage objects if the drain pipe is protected against backflow.
Retrofitting level-access showers
It's never too late for a level-access shower! If in the past the bathroom has featured a shower with a shower tray, there are already water connections at the correct height. If the bathroom was previously equipped with a bathtub, the connections can be relocated and positioned higher up.
Other than the position of the pipes, when retrofitting a level-access shower, a few other aspects have to be taken into account and harmonised with each other. The substructure, the floor structure, the accumulated quantity of water and the existence of a shower partition, for instance, also have an influence of the choice of drainage system, the slope and the waterproofing.
Drainage systems for level-access showers
If you are planning a level-access shower, you are really spoiled for choice. It begins with the decision between a shower channel and a floor drain. Drainage systems are available as complete systems, as freely combinable components, as is the case with the DallFlex system, there are shower elements with integrated slope and solutions with a pump. When deciding in favour of one system or the other, it is important to make sure that it meets the basic requirements and suits the conditions on site – in particular the existing structure height.
Basic requirements
- Drainage rate: For flawless drainage the drainage rate should match the fitting. Standard shower fittings produce a flow volume of 0.15 to 0.2 l/s. However, when it comes to luxurious rain showers, much greater rates of water can be produced.
- Installation height: Must suit the existing structure height and accommodate the required shower slope.
- Connections: The outlets should suit the bonded waterproofing and standardised pipelines.
- Odour seal: New shower channels and floor drains have a removable trap insert which prevents drain odours from entering the bathroom. DIN EN 1253-1 defines a water trap height of 50 mm as safe.
- Load-bearing capacity: Everything that is located on or in a walkable shower surface is subjected to a traffic load, i.e. the covers of shower channels and floor drains. Usually they have to be graded as load class K 3 (= loadable up to 300 kg) as per DIN EN 1253.
- Fire insulation: In case of fire, the flames spread more quickly through vertical ceiling feed-throughs. Therefore, measures for preventive fire insulation should be taken. More on the subject of fire insulation
- Sound insulation: In order to keep the noise pollution from drainage sounds in the drainage pipe and from the impact noise caused during use to a minimum, the minimum requirements for sound insulation as per DIN 4109 must be observed. Optionally, stricter sound insulation targets can be contractually agreed. Dallmer's drainage systems either meet or exceed the requirements of DIN 4109 and VDI 4100. More on the subject of sound insulation
Floor structure and structure height
Using the example of the CeraFloor Select shower channel + DallFlex Plan drain body
When retrofitting level-access showers, particular attention has to be paid to the structure height, the bonded waterproofing and the screed structure.

1. Structure height
2. Tiles
3. Tile adhesive
4. Bonded waterproofing
5. Screed
6. Thermal insulation
7. Concrete surface
The structure height indicates how much space is available in the floor. It comprises the thickness of the layers between the tiles and the substrate (the supporting concrete surface). In between there is usually thermal insulation and/or footfall sound insulation, the screed, the bonded waterproofing or the floor surface.
The architectural drawings provide information on the structure height. If these documents are no longer available, a sample drilling has to be made. The aim is to determine at least the structure height as it dictates which drainage system can be used.
Different drainage systems for level-access showers
If you wish to install a level-access shower in an existing bathroom, you have a choice of different outlet systems. These include classic options with sloped screed, variants with shower underlay and alternatives with pump systems for construction situations with lower structure heights.
Systems for installation in the screed

Example installation: CeraWall Select shower channel and DallFlex drain body
Drainage systems which are installed in the screed and incorporated into the surface sealing are the most common option. For this purpose, the shower surface is recessed in the bathroom floor. The drain body is positioned in this recess, i.e. lower than the upper edge of the floor. The lowered position is necessary so that the screed can subsequently be applied with a sufficient slope. Beforehand, however, the drain body has to be screwed to the slab and connected to the drainage pipe.
The screed is then applied to the entire area and the slope is generated. The connection to the bonded waterproofing is then made and the floor and wall areas are tiled. These systems facilitate major freedom for the design and dimensioning of the shower surfaces. Drain bodies with particularly low overall installation heights are recommended for refurbishments. Dallmer supplies drain bodies with particularly low installation heights for this purpose. The DallFlex Plan drain body, for example, has an installation height of just 65 mm. The standard installation height for this drain body is 90 mm.
Installation example, floor drain for creation of a level-access shower
CeraWall Select shower channel + DallFlex drain body

- First waterproofing layer
- Sealing sleeve, 100 mm all round
- All-round sealing tape
- Second waterproofing layer
- Safety tape with cut protection
- Tile adhesive
- Channel with cross slope
- Drain body
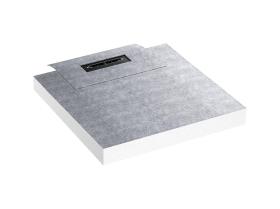
Systems with shower underlay

Example installation: DallFlex Floor shower underlay and CeraFloor Select shower channel
Hard foam floor elements with integrated slope and drain can be used without screed slope. When retrofitting, however, it may be necessary under certain circumstances to chisel out a piece of the screed. Which shower underlay fits your own bathroom cannot be determined with any certainty until the old shower or bathtub has been removed. What can be done also depends on the height and position of the drainage pipes.
Dallmer shower underlays for shower channels and point drainage systems cover a broad range of installation situations. The DallFlex shower underlay can be combined with nine different channels which can be positioned on the wall, near to the wall or centrally. CeraBoard for point drainage is available in various geometries and with differently positioned drain points.
Shower underlays are tiled and the tiles should be matched to the other floor covering. Which size of tile is suitable depends on the compressive strength of the foam being used, which is why manufacturers normally recommend a minimum size. Shower underlays from Dallmer should be covered with tiles of 5 x 5 cm and larger; they are then suitable for unproblematic use with a wheelchair. Furthermore the shower underlay has to be incorporated into the bonded waterproofing in the wall or floor area.
Bonded waterproofing
Only proper waterproofing for the shower area guarantees continuous reliability, even in case of regular water loads. Defective waterproofing on the other hand can lead to expensive consequential damage. This is why the bonded waterproofing as per DIN 18534 should be implemented when refurbishing.
Correctly waterproofing level-access showers

The flexible DallFlex sealing sleeve for mounting bonded and sheet waterproofing as per DIN 18534
The DIN 18534 waterproofing standard takes into account the challenges of level-access showers: when it comes to installing and waterproofing, for example, the seal beneath the floor covering and adhesive needs to be established during installation. Bonded waterproofing is now recognised as state of the art. When it comes to implementing waterproofing as per DIN 18534, various aspects have to be considered, above all the type of connection for the flange and sealing sleeve, the minimum flange width and the water exposure class, i.e. the expected water load in the respective shower.
DIN 18534 states that level-access showers in private bathrooms belong to water exposure class W2-I, meaning they are exposed to a high level of strain from water. In this case, the waterproofing has to be implemented with crack-bridging, mineral sealing slurries or reactive resins, the minimum thickness of the dry layer being 2 mm. Alternatively, sheet waterproofing can also be used. Waterproofing with polymer dispersion coatings (minimum thickness of the dry layer: 0.5 mm) is only suitable for areas that are merely exposed to splash water (wall area). DIN 18534 dictates that in the area of the shower surface (floor) polymer dispersions must not be used under any circumstances.
More on the subject of DIN 18534
Partitioning for the shower area
Alongside the typical shower cubicle with a door, other options are also conceivable, for example, partition walls without a door or a shower niche. In this case too, the partition has to be matched to the local conditions. The type of partition should be known before installing the shower so that the necessary waterproofing area can be clearly defined.
Sealing channels and floor drains
The purposes of waterproofing are not just restricted to the wall and floor areas. In particular the transition points between the screed and the drain body have to be carefully waterproofed. Fleeces, sealing tapes and sealing sleeves are usually also used. These are incorporated into the bonded waterproofing. The DallFlex system from Dallmer, with the on-site clamping connection of a sealing sleeve, provides a particularly reliable and straightforward option. In the process the sealing sleeve is simply clipped into the drain body at the point at which the bonded waterproofing is genuinely established. This method ensures a safe transition from the waterproofing to the drainage system. In general the entire bathroom must be waterproofed in the floor area for level-access drainage systems.
Feed-throughs
Subsequent feed-throughs made at the waterproofing level are regarded as particularly delicate. If these types of feed-through cannot be avoided, for example, because they are needed for fittings or the shower equipment, they must be planned and implemented so that the waterproofing does not become damaged. Ideally these types of feed-through should be planned in advance, before the bonded waterproofing is established.
Screed including sloped screed

Implemented slope of 2%
Shower drainage works with gravity. That's why the shower surface requires a certain slope, which is normally implemented as what is referred to as a “sloped screed”. Channels or floor drains are installed at the lowest point of the shower surface. The slope must be planned and implemented so that the water is directed to the outlet. In the process, when it comes to planning the slope, the accumulated water quantity and the expected water over grate level must be taken into account.
Angle of inclination

Slope 2% in cross section

Slope 2% in system section
An angle of inclination of 2% within the area is recommended if the outlet is situated in the middle of the shower area. If the shower channel is positioned on the wall, a slope of 2 cm is estimated for a shower area of 1.5 m2, for larger shower areas a slope of 2% is required. The correct planning and implementation of the slope is essential for flawless drainage. A slope with the correct inclination prevents puddles, contributes towards a sufficient drainage speed and directs the service water exactly to the outlet.
The peculiarities of slope planning
If there is no partition to keep splash water in the shower area, a slope is also recommended for bathroom floors so that the water does not build up there. When planning a slope in the vicinity of doors and frames, the position of the shower area and the drainage system, the height of the water-carrying layers and the possibility of water being transferred to adjacent rooms all play a role. Normally, the slope is laid so that it runs towards the drain and away from the door. In the process, no water from the waterproofed areas must penetrate into the non-waterproofed areas. Depending on the intensity of the water impact, it may be necessary to install a 1 cm raised threshold in the door area. DIN 18534 states that the waterproofing must also be extended up the reveal and be laid behind the frame.
Standards and rules
DIN EN 12056 – Gravity drainage systems inside buildings
This standard defines the requirements for drainage systems inside buildings. Part 1 provides information on the basics. These include, for instance, the area of application: the standard applies to residential buildings, business buildings and industrial structures. DIN 12056-1 also defines the most important terms related to the subjects of (waste) water types, ventilation ducts and pipes. It lists the requirements which have to be met, for example, with regard to safety or hygiene. Part 2 of the standard deals with the planning and calculation of wastewater pipes.
DIN EN 1253 Gullies for buildings - Part 1: Trapped floor gullies with a depth water seal of at least 50 mm
DIN EN 1253 describes the technical design and tests for drainage objects. This covers the following aspects: the required flow rate of the drainage objects, the use of trap inserts and the load classes for grates and covers for floor drains or shower channels. The aim of this standard is to guarantee a high suitability for use of the drains.
DIN 18534 – Waterproofing of indoor rooms
The waterproofing of indoor rooms, and thus also of level-access showers, taking into account the connection type, the flange width and the water exposure class is the subject of this standard. It deals with connections with sealing sleeves, on-site adhesive or clamped connections and factory-made connections. DIN 18534 defines the minimum width of the flange and the water exposure classes so that the waterproofing suits the actual water load.
IVD data sheet no. 3 “Constructional design and waterproofing of joints in sanitary and wet rooms”
This data sheet provides all the necessary information on the subjects or sealants and joints. This includes the quality requirements for sealants, the correct choice of said sealants and the dimensions and design of floor and wall joints. The data sheet also explains the use of system components and aids, the incorporation of the sealant and the maintenance, care and renovation of joints.
The VDI 6000 directive series – Equipment for sanitary rooms
Directive VDI 6000 deals with the planning, dimensioning and equipping of sanitary rooms. Alongside the bathroom, sanitary rooms include guest toilets, kitchens, laundry rooms and utility rooms. The series of directives provides different guidelines in separate documents for sanitary rooms in residential properties, places of work, places of public assembly, hotels, old people's homes, nurseries and schools.
DIN 4109 – Sound insulation in high-rise buildings
The Regional Building Code requires that buildings are fitted with appropriate sound insulation in order to protect residents/users against unreasonable annoyances and harmful effects on their health. DIN 4109 defines the minimum requirements, the supplementary document “sheet 2” formulates recommendations for increased sound insulation. In relation to bathrooms and level-access showers, this standard defines the limit values for footfall sound and functional noise.
DIN 4102-1: Fire behaviour of building materials and components
This standard defines the fire resistance classes, which materials can be used in house technology and how the components and materials are to be tested. DIN EN 13501 fulfils a similar purpose at European level.
DIN 18040: Construction of accessible buildings – Design principles
DIN 18040 applies if a bathroom or shower is to be designed to be barrier-free. It is used in the broadest sense for planning, dimensioning and implementation of structural systems from a point of view of barrier-free accessibility. The aim is to enable all citizens to take part in society and move freely, without particular impediments and basically without help from others. In conformity with the German Equal Opportunities for People with Disabilities Act (BGG), the standard DIN 18040 aims to ensure that the existing infrastructure can be used by all citizens equally. This also includes dimensioning and equipping of bathrooms, both in private apartments and in public buildings.
Glossary
Bonded waterproofing is necessary because coverings with joins, such as tiles, panels and natural stone, are not waterproof by themselves. The basis of bonded waterproofing is a paint/filler seal coating or a waterproofing membrane. The tiler lays panels or tiles using the thin bed method. Bonded waterproofing must be carried out everywhere where splash water or service water occurs.
This standard aims to safeguard the quality of drinking water. It deals with all questions of planning, implementation and selection of materials. This includes techniques for preventing corrosion and scale formation and specifications for the diameter of the pipe and the necessary pressure in the pipe.
Short for European Technical Approval. The ETA is a certificate of performance for construction products for which there are not yet any (or no complete) harmonised standards at EU level. ETA certification opens the door for marketing construction products in the European Economic Area. In Germany the Deutsche Institut für Bautechnik (DIBt (German Institute for Construction Engineering)) is responsible for approvals.
This Test Certificate is issued for products which are not significant to the safety of a physical structure or which can be assessed within the scope of a generally recognised inspection process. The General Building Supervisory Authority Test Certificate confirms that a product can be used for its respective purpose. The issuing of a General Building Supervisory Authority Test Certificate is the responsibility of certain legally recognised testing authorities.
In order to prevent gases from entering into the bathroom (or other sanitary rooms) from the sewage system, drains require an odour seal. The classic variant comprises a siphon, also referred to as an odour trap, which is filled with a water trap. This water forms a non-permeable barrier between the channel and the bathroom.
The recognised rules of technology include sets of rules, the importance of which has been proven academically and which have been proven in practice.
The total thickness of the floor construction from the slab to the floor covering (tiles) is referred to as the structure height. The installation height of a drain body, on the other hand, indicates how much space this housing requires in the floor.
Relevant products
drain body DallFlex
drain body DallFlex Plan
drain body DallFlex vertical
shower underlay DallFlex Wall Plan
shower underlay DallFlex Floor Plan

shower underlay DallFlex Compact Plan
air-admittance valve DallVent Maxi
air-admittance valve DallVent Mini

pipe coupling HT/SML
drain body DallFlex
drain body DallFlex Plan
drain body DallFlex vertical
shower underlay DallFlex Wall Plan
shower underlay DallFlex Floor Plan
shower underlay DallFlex Compact Plan
air-admittance valve DallVent Maxi
air-admittance valve DallVent Mini
pipe coupling HT/SML
Further downloads
Brochures, references, data sheets, etc. are available in our Download section.
Dated: October 2019